Solving OWASP MSTG UnCrackable App for Android Level 2
With the UnCrackable App level 1 solved, the obvious next step is to take on Level 2. It’s similar to level 1 and contains a secret code that needs to be found.
Preparations
Things are getting a bit more complicated this time, so in addition to dex2jar and JD-GUI that we used last time we’ll also need a tool that can help us analyze native libraries. I’m going to use Ghidra since that’s free and simple enough to get started with, without too much prior experience. There are many other tools that could be used as well like IDA which is an extremely capable tool, but also very expensive. There is however a free version available for non-commercial projects.
Download the apk from the OWASP crackmes page, install it on the phone and also run the apk trough dex2jar and open the jar file in JD-GUI. Also open up the apk file in any zip capable program and extract the libfoo.so native library matching the architecture you’re running on from the lib directory. For me this was the one in the x86_64 directory.
Getting started by bypassing the root detection
Let’s start by taking a quick look at the code for the app in JD-GUI. It looks fairly similar to the previous one, but it seems like the code check has been moved into native code. This app is using a similar root check as before, so let’s try to use the same bypass as we used the last time.
Error: a(): has more than one overload, use .overload(<signature>) to choose from:
        .overload('java.lang.String')
        .overload('sg.vantagepoint.uncrackable2.MainActivity', 'java.lang.String')
    at pe (frida/node_modules/frida-java-bridge/lib/class-factory.js:549)
    at ve (frida/node_modules/frida-java-bridge/lib/class-factory.js:538)
    at frida/node_modules/frida-java-bridge/lib/class-factory.js:911
    at /uncrackable2.js:11
    at frida/node_modules/frida-java-bridge/lib/vm.js:11
    at frida/node_modules/frida-java-bridge/index.js:389
    at frida/node_modules/frida-java-bridge/index.js:372
    at we (frida/node_modules/frida-java-bridge/lib/class-factory.js:598)
    at frida/node_modules/frida-java-bridge/lib/class-factory.js:581
It seems like the a() method have several overloads. We need to specify which one we want to use. This is fairly straight forward. Instead of using a.implementation, we need to use a.overload("java.lang.String").implementation instead. Making our update root check bypass look as follows:
  var MainActivity = Java.use("sg.vantagepoint.uncrackable2.MainActivity");
  MainActivity.a.overload("java.lang.String").implementation = function(s) {
    console.log("Tamper detection suppressed, message was: " + s);
  }
Diving into native code
As mentioned earlier, it seems like the code check has moved into native code, just returning if the entered code is correct or not. So to find the code we need to look at the native code included in the libfoo.so library.
If you are on Linux using nm can provide you with some information on what it contains:
nm --demangle --dynamic libfoo.so. However I’m on Windows, so I’m going to use Frida to get the same information.
To do this let’s write an utility function that searches for a certain module in memory and then list all imports, exports and symbols in that module. Since we are likely going to modify some part of the code, let’s also make it possible to specify a name that we’re particularly interested in and let the function return the memory address of that name.
// Lists all names (exports, imports and symbols) in the given module
// if a 'needle' is given this function returns the address of the name
// that matches the 'needle'
function listNames(module, needle) {
  var address = undefined;
  console.log("Names found in " + module + ":");
  Process.enumerateModules()
    .filter(function(m){ return m["path"].toLowerCase().indexOf(module) != -1; })
    .forEach(function(mod) {
      mod.enumerateExports().forEach(function (entry) {
        console.log("Export: " + entry.name );
        if (entry.name.indexOf(needle) != -1) address = entry.address;
      });
      mod.enumerateImports().forEach(function (entry) {
        console.log("Import: " + entry.name );
        if (entry.name.indexOf(needle) != -1) address = entry.address;
      });
      mod.enumerateSymbols().forEach(function (entry) {
        console.log("symbol name: " + entry.name );
        if (entry.name.indexOf(needle) != -1) address = entry.address;
      });
    });
  console.log("");
  return address;
}
This function uses Process.enumerateModules() to enumerate all loaded modules and then filter out those matching the given name. Other options could also be Process.findModuleByName(name) or Process.getModuleByName(name) which would have worked just as fine.
Then for each module that is found it enumerates all exports, imports and symbols by using Module.enumerateExports(), Module.enumerateImports(), and Module.enumerateSymbols() and printing them to the console.
With this function in place let’s hook into onResume() like last time and call listNames('libfoo.so') from it to see what it contains.
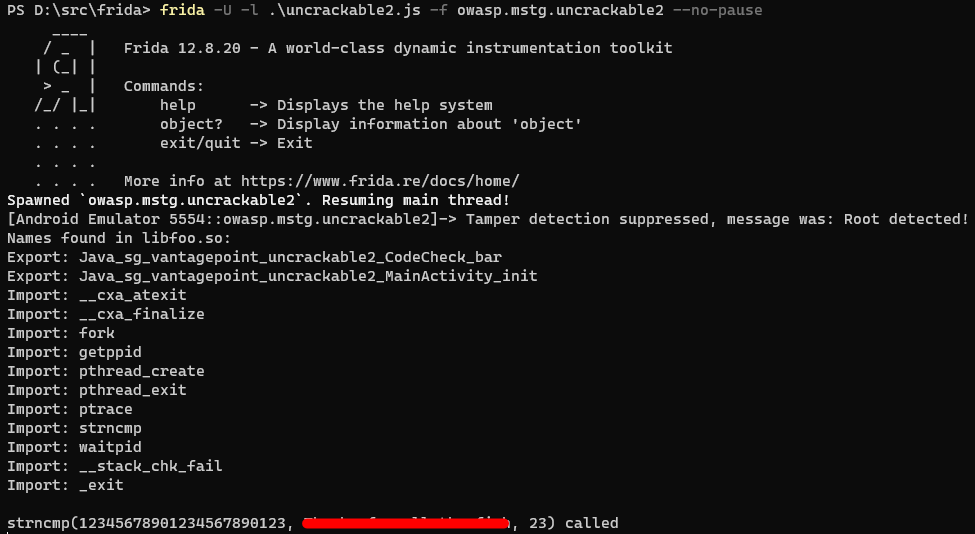
Names found in libfoo.so:
Export: Java_sg_vantagepoint_uncrackable2_CodeCheck_bar
Export: Java_sg_vantagepoint_uncrackable2_MainActivity_init
Import: __cxa_atexit
Import: __cxa_finalize
Import: fork
Import: getppid
Import: pthread_create
Import: pthread_exit
Import: ptrace
Import: strncmp
Import: waitpid
Import: __stack_chk_fail
Import: _exit
Comparing strings
We don’t know much about what libfoo.so actually does, but one thing that is certain is that it compares the string given by the user with the secret code at some point. Looking at the names revealed by Frida, a good guess is that it’s using strncmp to do this comparison.
Let’s hook into strncmp and see what values it’s called with. One should be the string the user inputs and the other should be the secret code.
To try this theory, let’s create a quick function for attaching to strncmp:
function attachToStrncmp(strncmpAddress) {
  Interceptor.attach(strncmpAddress, {
    // strncmp takes 3 arguments, str1, str2, max number of characters to compare
    onEnter: function(args) {
      if (args[2].toInt32() > 10 && args[2].toInt32() < 30 ) {
        console.log("strncmp, arg1: " + args[0].readUtf8String() + ", arg2: " + args[1].readUtf8String() + ", arg3: " + args[2].toInt32());
      }
    },
  });
}
To attach to a native function we use Interceptor.attach() which takes the addres of the function to attach to and an object with callbacks for onEnter and onLeave. We’re not interested in the return value of the function so we leave out onLeave.
The args parameter in the callback is an array of NativePointer objects for the arguments of the function. Since the third argument of strncmp is an integer we call NativePointer.toInt32() on it to cast the pointer to a 32 bit integer.
The first two arguments are strings, and to read them we use NativePointer.readUtf8String(). Since we don’t know how long the strings are we hope that it’s standard null terminated strings and don’t pass any length parameter.
Instead of calling the readUtf8String() function on the NativePointer object, it is also possible to call Memory.readUtf8String(args[0) even though I can’t find any information about this in the Frida documentation.
With all this in place we have a function that prints the arguments that strncmp is called with as long as the string is between 10 and 30 characters long. These limits were chosen arbitrarily to reduce the amount of spam printouts.
Now we also need to update onResume() so that it first finds strncmp by passing in strncmp as the second argument to the utility function we wrote earlier and then attach to it:
    var strncmp = listNames('libfoo.so', 'strncmp')
    attachToStrncmp2(strncmp);
With all this in place we can start the app and enter a long and distinct string like 123456789012345 and hit the verify button. This should make it easy to see when strncmp is called with our string.
...
strncmp, arg1: t;
}

, arg2: amplerExternalOES, arg3: 17
strncmp, arg1: GL_emulation, arg2: GL_emulation, arg3: 28
strncmp, arg1: GL_emulation, arg2: GL_emulation, arg3: 28
strncmp, arg1: GL_emulation, arg2: GL_emulation, arg3: 28
strncmp, arg1: GL_emulation, arg2: GL_emulation, arg3:
That’s not good, the string we entered doesn’t show up at all. It seems like strncmp isn’t called at all on our string. Could it be that the app doesn’t use strncmp for comparing the secret string after all?
Going deeper
To be honest, it took me quite some time before I figured out how to proceed from here. I thought I might have misunderstood how to attach to native code and that I was doing something wrong, but after a while I decided that I had to take a deeper look at libfoo.so so I installed Ghidra and opened libfoo.so in it.
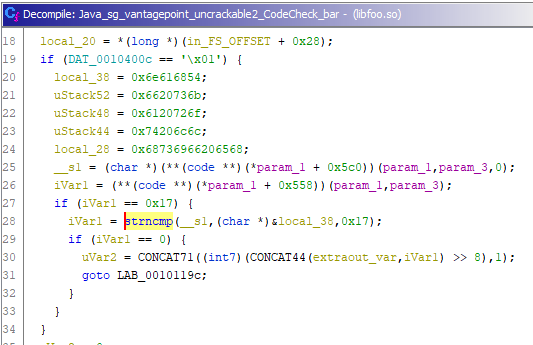
Without too much trouble it’s possible to find the function Java_sg_vantagepoint_uncrackable2_CodeCheck_bar which is called from the Java code when the code check takes place. The decompiled code isn’t trivial to understand, but it’s possible to see that strncmp is in fact called from this function. What’s more interesting is that strncmp is only called if the value of iVar1 is 0x17 or 23 in decimal. This is also the value of strncmp’s third argument.
Finding the secret
It looks like our first approach was in the right direction, but we have to make sure to use a 23 character long string so that the comparison against the secret code takes place.
Let’s clean up our attachToStrncmp function and make it a bit more generic so that it takes an extra string as argument and print any calls to strncmp where one of the arguments match the given string.
function attachToStrncmp(strncmpAddress, compareTo) {
  Interceptor.attach(strncmpAddress, {
    onEnter: function(args) {
      var len = compareTo.length;
      if (args[2].toInt32() != len) {
        // Definitely comparing something uninteresting, bail.
        return;
      }
      var str1 = args[0].readUtf8String(len)
      var str2 = args[1].readUtf8String(len)
      if (str1 == compareTo || str2 == compareTo) {
        console.log("strncmp(" + str1 + ", " + str2 + ", " + len + ") called");
      }
    },
  });
}
We also update our code in onResume() so that it looks for a particular 23 character long string.
    var theMagicWord = "12345678901234567890123";
    var strncmp = listNames('libfoo.so', 'strncmp')
    attachToStrncmp(strncmp, theMagicWord);
Now all we have to do is to run the app and enter the string 12345678901234567890123 and press submit to reveal the secret.
Automating the secret extraction
Doing manual work when you don’t have to is such a chore, let’s automate the secret extraction in a similar way to what we did in Level 1. Last time we just had to call a static method to trigger the verification. This time the verification is done by a non-static instance of the CodeCheck class, so we first need to find the instance before we can use it. This can be done with the Java.choose() function that enumerates all live instances of the given class name.
So let’s put the following code at the end of onResume():
    Java.choose("sg.vantagepoint.uncrackable2.CodeCheck", {
      onMatch : function(instance) {
        instance.a(Java.use("java.lang.String").$new(theMagicWord));
        return "stop";
      },
      onComplete:function() {}
    });
We’re now almost complete, lets just also tack-on one final line where we remove our hook on strncmp.
Interceptor.detachAll();This partly because we’re no longer interested in any further comparisons since we’ve already gotten the string and also partly to avoid adding multiple identical hooks to strncmp when onResume() is called several times.
With this we’re finally done and have a nice solution that gives us the secret code by just starting the app with our script.
Things learned
We’ve learned a lot of new things solving this problem. Here are some highlights:
- How to modify the implementation of a method with overloads.
- How to use
Process.enumerateModules(),Module.enumerateExports()andModule.enumerateImports()to investigate what a certain module contains. - How to attach to native functions with
Interceptor.attach()and get callbacks when they are called and when they return. - How to cast
NativePointerobjects to integers for arguments that are integers usingtoInt32(). - How to read a string from the location that a
NativePointerpoints to usingreadUtf8String(). - Using disassemblers or other reverse engineering tools can give helpful insights into what native code does.
- How we can use
Java.choose()to find live instances of classes.
Useful links
Here are a couple of links to other pages that I’ve found especially helpful when trying to solve this problem:
- The Frida JavaScript API is extremely helpful for information regarding what’s possible.
- Adventure on Security’s Frida Scripting guide for Java has a lot of information on the basics of Frida scripting.
- 11x256 have a 5 part Frida hooking Android series where especially part 2 covers several of the things we did to solve this problem.