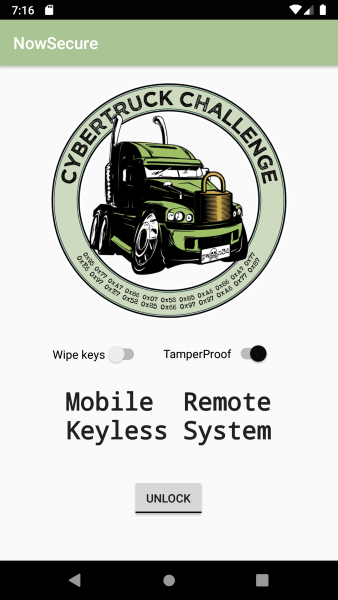
CyberTruckChallenge19
The CyberTruckChallenge19 is an Android Crackme / CTF with a couple of challenges intended to be solved using Frida which I’m taking doing in this post.
I’m usually using Dex2Jar to convert apk files to jar files and JD-GUI to decompile the jar files to readable Java code. But Dex2Jar failed to process the cybertruck apk so I had too look for alternatives and found JADX instead. It’s a decompiler that can open apks directly and show things like the Android manifest, resources and the decompiled source code right away. This was quite nice so I will likely use JADX instead of Dex2Jar and JD-GUI in the future.
Bypassing the Frida detection
The challenge description say that experienced Android reversers should enable the TamperProof switch to harden the application before unlocking the cars.
When running the app on a phone with the Frida server installed the app shuts down immediately when the TamperProof setting is enabled.
Looking at the code using JADX we can see that the switch is connected to a hook detector class that checks if Frida is installed on the phone using a couple of common names.
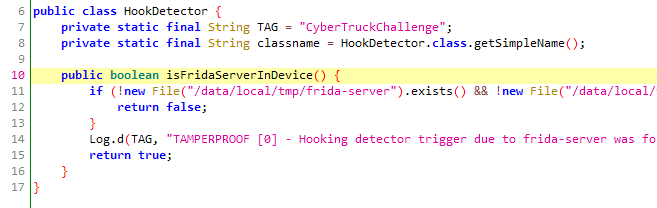
One solution to this could be to rename the Frida server on the device, but it’s easier to just write a simple hook to bypass the check instead.
Java.perform(function(){
  bypassHookDetection();
});

function bypassHookDetection() {
  var HookDetector = Java.use("org.nowsecure.cybertruck.detections.HookDetector");
  HookDetector.isFridaServerInDevice.implementation = function() {
    console.log("Frida detection bypassed");
    return false;
  }
}
Saving this as cyber.js and running frida -U --no-pause -l cyber.js -f org.nowsecure.cybertruck allows us to bypass the hardening and run the app.
Solving Challenge1
Each challenge have one static, hard coded secret and one that is dynamically generated when the app is run. The static one can be easily found by analyzing the apk, so I’m focusing on the dynamic secret. For Challenge1, there is a class called Challenge1 which is not obfuscated, so it’s easy to see what’s going on.
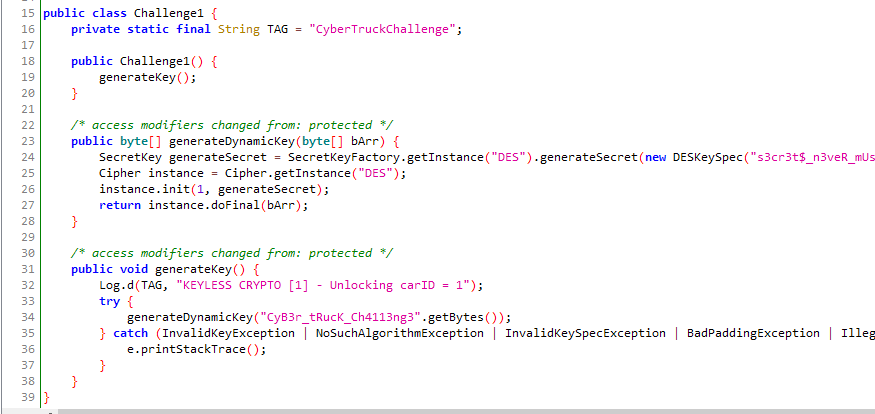
Our objective is to get the encoded key as a hexadecimal string. The generateDynamicKey method returns the key as a byte array, so we will have to convert the byte array to a hexadecimal string. Let’s create a small function for that.
One thing to remember is that when we look at the return value from generateDynamicKey with Frida we will get a Java byte array, which is not the same as a Javascript array, so we can’t use Javascript array methods on it.
// Converts a Frida Java byte array to a hex string.
function toHexString(byteArray) {
  var ret = ""
  // byteArray is a Java array, not a javascript array so things like foreach
  // and Array.from doesn't work
  for (var i = 0; i < byteArray.length; i++) {
    // Frida's Java byte array uses signed bytes, do bitwise & to convert to a signed byte
    // Then convert to a string with a leading zero, and take the last two characters
    // to always get exactly two characters for each byte.
    ret += ('0' + (byteArray[i] & 0xFF).toString(16)).slice(-2)
  }
  return ret;
}
Now that we have this utility function we can write the actual code to extract the dynamic secret. All we have to do is to hook generateDynamicKey and look at what it returns when called.
function challenge1() {
  var Challenge1 = Java.use('org.nowsecure.cybertruck.keygenerators.Challenge1');
  Challenge1.generateDynamicKey.implementation = function(bArr) {
    var ret = this.generateDynamicKey(bArr);
    console.log("Challenge 1 key: " + toHexString(ret));
    return ret;
  }
}
Solving Challenge2
The second challenge is very similar to the first, the main difference is that it’s been obfuscated so the code is slightly harder to follow than in the first one. After looking around in the code a bit it becomes obvious that we’re interested in the class org.nowsecure.cybertruck.keygenerators.a and especially the return value of the method a(byte[] bArr, byte[] bArr2).
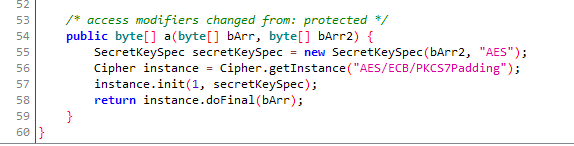
As with the first challenge we’re supposed to provide the key as a hexadecimal string, so the solution becomes very similar to to last time, we just need to pick the correct overloaded method to hook.
function challenge2() {
  var Challenge2 = Java.use('org.nowsecure.cybertruck.keygenerators.a');
  Challenge2.a.overload('[B', '[B').implementation = function(bArr1, bArr2) {
    var ret = this.a(bArr1, bArr2);
    console.log("Challenge 2 key: " + toHexString(ret));
    return ret;
  }
}
Solving Challenge3
With challenge 1 and 2 solved fairly easily, things becomes much harder in the third challenge since the secret is hidden in native code. I’m fairly inexperienced with reversing native code, so I’m going to extract the static secret using Frida for some extra experience. An easier approach would be to just dump the strings in the library.
As in my earlier posts where I deal with native code I’m extracting the native library from the apk and opening it up in Ghidra. This time there is only one function (called init) and it’s fairly small as well.
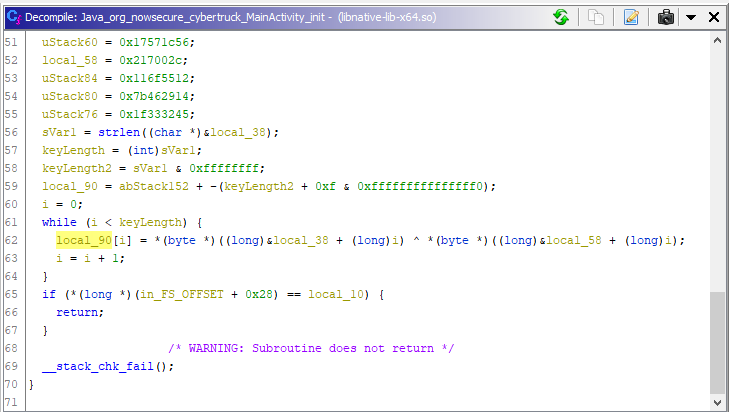
Getting the static key
We can see that strlen is called on a locally defined string, which is must likely the hard coded key. So to extract this key we need to check what argument strlen is called with. Our problem is that strlen is a very common function called extremely often, so just printing out all calls to it won’t work.
Attaching to it when the init function is called, and detaching from it when it leaves helps. However since Android is multithreaded there are still many calls made to strlen during this time, so there is still improvements that can be made.
In the onEnter and onLeave callback functions of Interceptor.attach the this object have some useful properties like the returnAddress of the intercepted function. This means that when intercepting strlen we can see from where it was called by looking at the return address.
Process.findModuleByName can be used to find the module for this challenge and by using Module.base and Module.size it is possible to see which address range the module occupies. If the return address of strlen falls within this range we know that it was called by the init function that we’re analyzing. This way we can concentrate on only the interesting call to strlen instead of all of them.
Putting all of this together makes it possible to extract the static key when it’s passed to strlen:
// Checks if the given address is located inside the given module
function isAddressInModule(moduleName, address) {
  var module = Process.findModuleByName(moduleName)
  return address >= module.base && address < module.base.add(module.size);
}

function challenge3() {
  Interceptor.attach(Module.findExportByName("libnative-lib.so", "Java_org_nowsecure_cybertruck_MainActivity_init"), {
    onEnter: function(args) {
      // The init functions calls strlen to check the length of the key, attach to it
      this.strlen = Interceptor.attach(Module.findExportByName("libc.so", "strlen"), {
        onEnter: function(args) {
          // strln is only of interest when actually called from libnative-lib.so
          if (isAddressInModule('libnative-lib.so', this.returnAddress)) {
            console.log("Challenge 3 key: "+ args[0].readUtf8String(32));
          }
        }
      });
    },
    onLeave: function(retval) {
      // Detach from strlen since we no longer need to listen to it.
      this.strlen.detach();
    }
  });
}
Getting the dynamic key
In the disassembled code we can see that there’s a while loop that performs an xor operation on the key and the encoded key. Both these are stored as local variables. Since we have extracted the key it would be easy to manually run the xor operation on the encoded data if we just found exactly where in the module it’s located.

I’m not that familiar with assembler or native libraries, so I decided to find where the computed value is stored instead. Unlike in previous challenges the decoded key is neither returned nor passed to any other function, instead it’s stored in a local variable that’s never used.
Local variables are stored on the stack, and the stack grows towards lower addresses. When a function returns, the stack pointer is just updated without modifying the data that was previously on the stack. This means that when the init function returns the decoded key will still be left in memory just outside the stack.
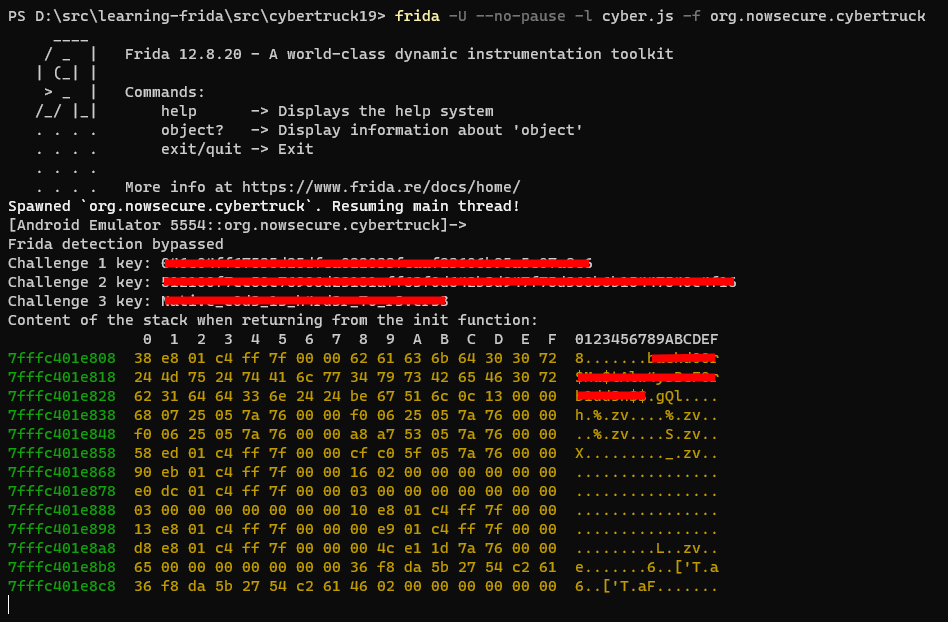
To interact with the stack we need the stack pointer. Luckily the this object of the interceptor callback functions contains a context object in addition to the previously used return pointer. This object in turn contains the stack pointer as sp. Now that we have the stack pointer, we just need to update our onLeave callback for the init function to use hexdump to dump enough memory for the decoded key to be visible.
    onLeave: function(retval) {
      // Detach from strlen since we no longer need to listen to it.
      this.strlen.detach();

      // the init function de-obfuscates the secret and stores it in a local variable
      // (on the stack). The stack grows towards lower addresses, so look at the content
      // of the stack before the stack pointer when returning from the init function.
      console.log('Content of the stack when returning from the init function:');
      console.log(hexdump(this.context.sp.sub(208), {offset: 0, length: 208, header: true, ansi:true}));
    }
}
Instead of trying to figure out exactly where this variable was stored I just used trial and error to find the appropriate amount of memory to dump. There aren’t many strings on the stack, so the actual key is easy to spot.
Running the script
After doing a bit of cleanup (final code) we’re ready to run the script and expose the secrets.
Things learned
The Java parts of this challenge was quite quick and easy, while the native part was much more challenging and thought me a couple of great lessons:
Interceptor.attachreturns a listener object that you can calldetach()on when the hook is no longer needed.- The
thisobject in theonEnterandonLeavecontains very valuable information like the return address, stack pointer, program counter and various registers. - By looking at the return pointer it’s possible to see who called the function in question and filter out all uninteresting calls to an imported function.
this.context.spcontains the stack pointer which is useful when having to look at data, like local variables, stored on the stack
Update 2020-08-22
While writing this post I realized that it’s possible to attach to individual instructions as well instead of attaching to functions. With this new knowledge I’ve taken on the third challenge one more time which I have written about in a new post.