Sniffing https traffic on Android 11
Being able to intercept, inspect and modify https traffic between an app and a server can be very useful. In this post I’m going to describe how you can do this with Burp Suite and the Android Studio Emulator running any Android version from 4 until 11 which is the latest version at the time of writing.
Basics
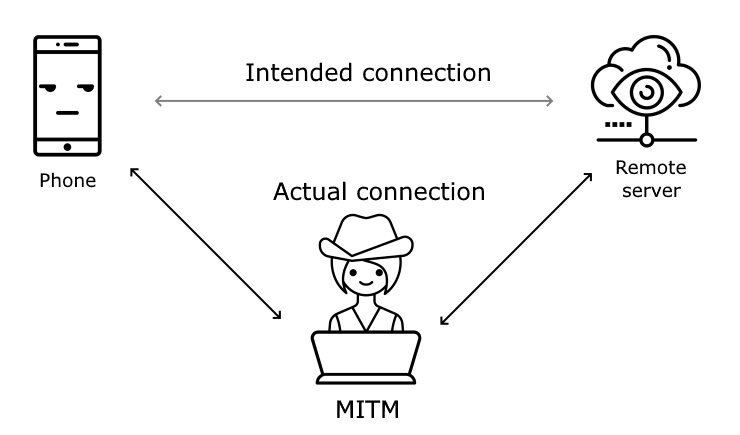
If you want to intercept traffic going in and out from a phone you can set up an http/https proxy server, make sure your phone uses it and then monitor all traffic going trough the proxy. By doing this you can easily see all http traffic, but since https traffic is encrypted the proxy is not able to read the data.
To be able to intercept the https traffic the proxy could pretend to be the remote server and present it’s own certificate to the phone when it is trying to connect to the remote server. However, since the proxy’s certificate is not trusted by the phone the phone will not accept this. If you can get the phone to trust the proxy’s certificate, for example by installing it as a trusted certificate, the phone will happily accept it when it is presented by the proxy.
When this is done the proxy decrypts the incoming request and can do whatever it wants with it, before it sets up a new https connection with the remote server, pretending to be the app and thus acting as a man in the middle (MITM).
Proxy and certificate setup
Installing the proxy
We’ll get started by installing and preparing the proxy server we want to use. My proxy of choice is Fiddler (classic), it’s pretty nice looking and easy to use for both observing and modifying traffic. While it works great most of the time, I haven’t been able to get it to work when I install it’s certificate as a system certificate on an emulator. With physical phones it works fine, but when using an emulator it breaks down. If you manage to get Fiddler working well with the Android Studio emulator, please let me know.
Due to this I have to settle with Burp Suite Community Edition instead. It’s a very powerful and popular choice even though I haven’t learned to like it yet.
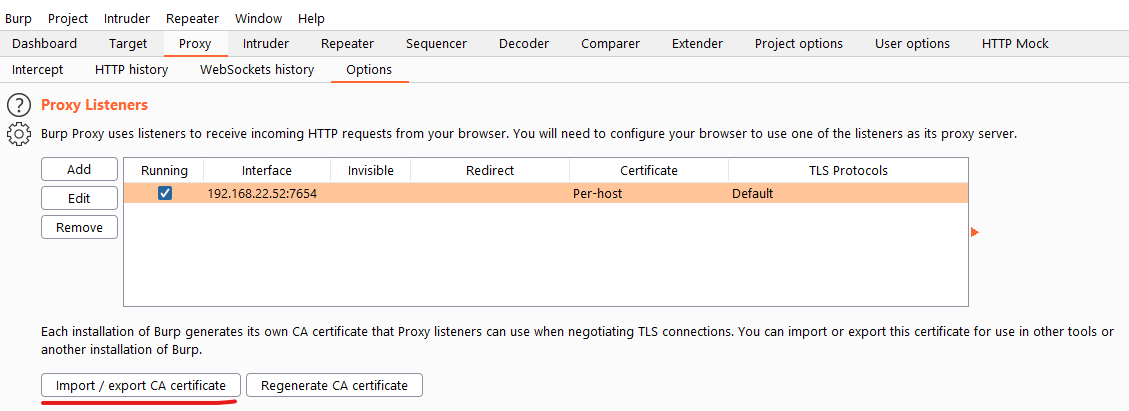
Install Burp and find your way to Proxy → Options and click on the Import / export CA certificate button and export the Certificate in DER format to a convenient place. While on the options page also add a proxy listener bound to your computer’s ip address and a suitable port and remember this for later.
Converting the certificate to the correct format
If you’re working with Android 6 or lower you can skip this section, but on newer Android versions we will have to install the proxy’s certificate as a system certificate. On Android, the system certificates are stored in PEM format in the folder /system/etc/security/cacerts/ with the filename <hash>.0.
The certificate we exported from Burp is in DER format, so we need to convert it to PEM using openssl and make sure that it has the correct filename:
openssl x509 -inform der -in burp.cer -out certificate.pem
cp certificate.pem `openssl x509 -inform pem -subject_hash_old -in certificate.pem | head -1`.0
Emulator setup
For maximum availability I’m using the emulator bundled with Android Studio. Genymotion is another option, but that’s only available for free for personal use so that comes with some limitations or additional cost.
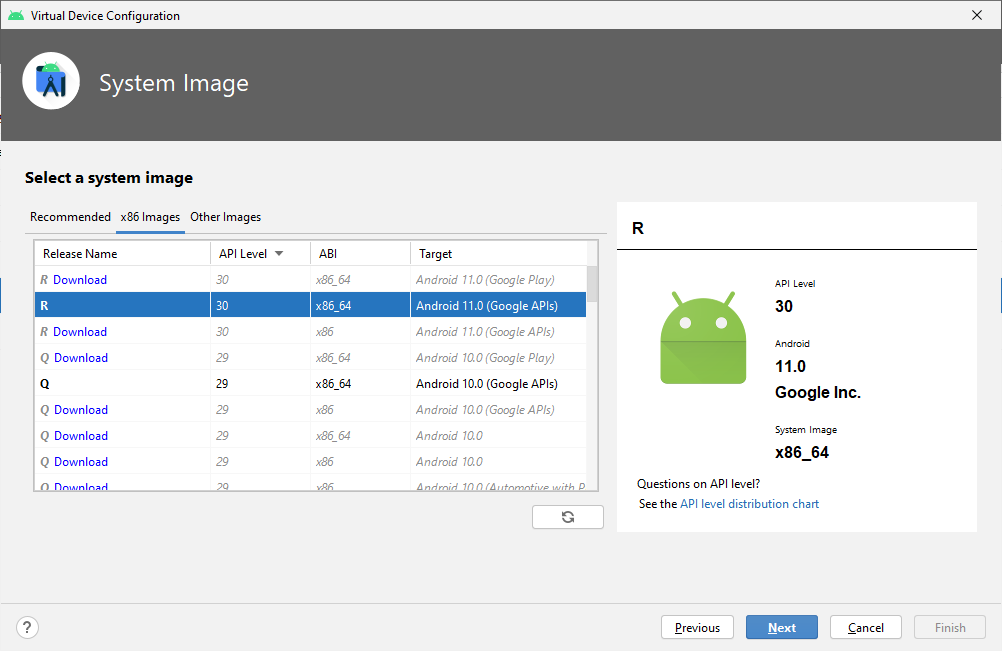
When it comes to choosing which image to use for the emulator there are three main choices: An image without any Google APIs, one with Google APIs and one with Google Play. The Google Play images includes the Google Play app and access to Google Play services. This would be ideal as it’s very similar to real phones, however they are considered production builds and root is not available on them.
Google API images lacks the Google Play app, but includes access to Google Play services and are not considered production builds which means root access is available. There is rarely any reason to pick a plain Android version without Google APIs.
It’s possible to intercept https traffic on any Android version from at least 4 and up to at least 11, so let’s go for the Android 11.0 (Google APIs) image.
Installing the certificate on the emulator
Android 4 - 6
On Android versions 4 to 6 the setup is very easy, you don’t even need root access for this. This makes these Android versions a great choice when testing real non-rooted phones with access to all Google apps and services that still support these versions.
Start by copying the certificate exported from Burp to the device or emulator. Then open up settings and find your way to Security → Install from storage and select the proxy’s certificate. You then give the certificate any name, select VPN and apps as “Credential use”, press OK and you’re done.
You can check that the certificate has been installed by going to Security → Trusted credentials → User. It’s also possible to remove the certificate from here if you want to.
Android 7 or newer
On Android 7 (Nougat) or newer, the system rejects user added certificates by default and only allows them if the app explicitly opts in to it. To get the phone to use your proxy’s certificate with any app, you have to install it as a system certificate. To do this you need root access and a writable system partition.
Starting the emulator with writable system
To be able to install the certificate, we need to start the emulator with a writable system. This is done by starting the emulator from command line with the parameter -writable-system. You also need to specify which system image you want to use, which you do with the -avd parameter. I called my image rRoot since that’s easy to type and remember.
./emulator -avd rRoot -writable-system
The location of the emulator executable depends on where you’ve installed your Android SDK. For me it is located in D:\Android\sdk\emulator.
Disabling verified boot (Android 10 and newer)
Starting with Android 10 it’s no longer possible to get a writable system partition on the images obtained trough Android Studio due to verified boot. So before we can do any changes to the system directory we need to disable verified boot. Luckily enough it’s possible to do this using the avbctl command line tool.
adb root
adb shell avbctl disable-verification
adb reboot
Installing the certificate
Before we can install the certificate we need to copy it to the device. The easiest way to do this is to drag-drop it onto the emulator to get it copied into the Download directory. Once that’s done we can install it as a system certificate. Pay attention to the name of your certificate, it might not be the same as mine.
adb root
adb remount
adb shell
cp /sdcard/Download/9a5ba575.0 /system/etc/security/cacerts/
chmod 644 /system/etc/security/cacerts/9a5ba575.0
reboot
Note: Android will only see your newly installed certificate if you start the emulator with -writable-system, so make sure to always start the emulator with this flag.
Verifying that the certificate has been installed
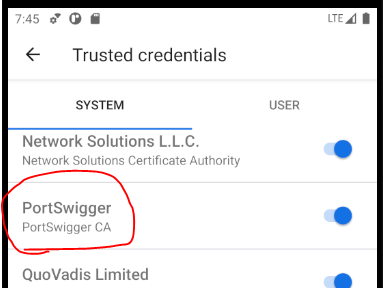
To verify that the phone has detected your certificate you can take a look at the list of trusted system credentials at:
Settings → Security → Advanced → Encryption & credentials → Trusted credentials → System
Scroll down in the very long alphabetic list and see if you can find your certificate. If you’re using Burp you should be looking for a certificate named PortSwigger. If you can find it everything is working and you’re ready to move on to the next step.
If not, double check that you have installed the correct certificate with the correct name and that the permissions are correct. It’s easy to accidentally change the permissions of the wrong certificate if using tab completion, it’s happened more than once for me.
Setup the emulator to use the proxy
With the certificate set up, the next step is to configure the emulator to connect to our proxy. There are several ways to do this, but the method that’s been most reliable for me is to set up a new APN that uses the proxy. If you are using a physical device, it’s probably better to edit the WiFi settings instead so that it uses a proxy.
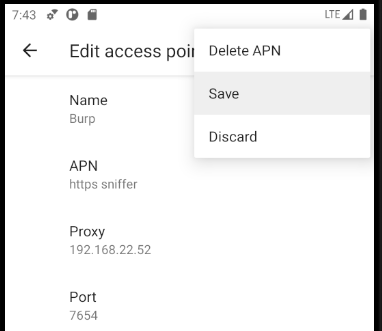
In the emulator, open up settings and navigate to Network & internet → Mobile network → Advanced → Access Point Names and press the plus button to add a new APN. On the Edit access point view that’s shown you can provide anything as Name and APN. I use “Burp” to easily recognize it. Under Proxy and Port you enter the IP address and port of your proxy server from earlier. Now you open the three dot menu and press save and then select the new APN.
With this setup all mobile traffic will go trough configured proxy. WiFi traffic will not go trough the proxy, so it’s good to make sure that WiFi is disabled.
Setup complete
Now we’re finally ready and should be able to intercept both http and https traffic from the emulator. To verify that everything is working we can fire up the browser on the emulator and load https://example.com and make sure that we can see the traffic in Burp.

When analyzing network traffic you might notice that some apps works fine when you’re not looking at the traffic, but refuse to communicate with their server when you are trying to intercept the traffic. This is usually because they have implemented certificate pinning as a method to prevent MITM attacks. This can be bypassed using Frida, but that’s a topic for another post.
Attribution
The MITM illustration in the beginning of the article is created by me (Niklas Barsk) and is available under the Creative Commons CCBY 4.0 license. It is a derivative work based on girl and Mmm by Xinh Studio, freelancer by Andrei Yushchenko and Eye by Flatart all from the Noun Project.