hpAndro Vulnerable Application Challenges - part 1
hpAndro Vulnerable Application is an Android CTF with a lot of challenges (100 at the time of writing) and new challenges are added every now and then. The challenges are based on the OWASP Mobile Security Testing Guide and there are many different types of challenges available. I’ve solved all the challenges and in this and the next two blog posts (part 2, part 3), I’m going to write about the ones I used Frida to solve.
I’ve solved these challenges over several versions of the app, so the code in this post might require some changes to work with the latest version, especially when it comes to obfuscated names.
Emulator detection
Let’s get started with one of the easier challenges for a couple of quick flags. The concept behind the emulator detection challenges is simple, the app does a series of emulator checks on startup and remembers the results. If you’re not running on an emulator you won’t be able to do the challenge. Then later on in each individual challenge the app does the same check one more time and if the emulator is not detected this time you are given the flag.
This made solving the level fairly easy with Frida, you just have to find the correct check methods and make them return false to prevent the emulator detection.
One important thing is of course to only modify the implementation of the check methods after you have started the application so that the emulator is detected on startup. So make sure you load the script after you have started the app.
Java.perform(function(){
  var emu = Java.use('com.hpandro.androidsecurity.utils.emulatorDetection.EmulatorDetector');
  emu.checkFiles.implementation = function(a, b){ return false }
  emu.checkIp.implementation = function(){ return false }
  ...
});
Root Detection
With the emulator detection challenges completed it’s good to continue with the root detection challenges. These are extremely similar only that it checks for root instead of emulator. So on app startup root has to be detected and when trying to get each individual flag root must not be detected.
For me several root check methods failed initially, so I had to first make them all pass when starting the app. So I hooked all the relevant check methods and made them always return true. Then I started Frida using the -f flag without having the app running to make sure my script was loaded before Frida spawns the target activity: frida -U --no-pause -l root.js -f com.hpandro.androidsecurity
Java.perform(function(){
  var root = Java.use('com.hpandro.androidsecurity.utils.rootDetection.RootDetectionUtils$Companion');
  root.checkFlagBusyBoxBinaries.implementation = function() { return true; }
  root.checkFlagSUExists.implementation = function() { return true; }
  ...
});
Once the app has started it’s just a matter of either commenting out the functions or changing them to return false instead and save the file. Since Frida automatically reloads the script when it changes, all that’s left is to go through each root detection challenge and collect the flags.
Device ID
After completing the root detection challenges the device ID category is a good next step. In one way they are fairly similar to the previous challenges, you find the suitable method and change their return value. The main difference here is that you hook Android APIs instead of methods in the app itself.
The main challenge is basically to find the right system api to hook, which can either be done by analyzing the app’s source code or just by some simple queries using your favorite search engine. Here’s an example of how you can modify the mac address which is required for one of the flags.
Java.perform(function(){
  var wifi = Java.use('android.net.wifi.WifiInfo');
  wifi.getMacAddress.implementation = function() {
    return "01:02:03:04:05:06";
  };
  ...
});
In some of the challenges there was no functionality to copy the flag which was fairly annoying. To avoid having to type the flag manually I wrote a small Frida script that intercepted the flag when it was presented and logged it to the console for easy copying. Here’s an example from the WiFi level:
  var macLevel = Java.use('com.hpandro.androidsecurity.ui.activity.task.deviceID.DeviceMacTaskActivity');
  macLevel.showFlag.implementation = function(flag) {
    console.log("Flag: " + flag);
    this.showFlag(flag);
  }
Device ID - an extra challenge
The IMSI level was a bit trickier than the others for me. I’m working with an Android 11 emulator and on Android 10 and newer the IMSI and a couple of other persistent device identifiers are no longer available at all. To complicate things jadx-gui failed to decompile the crucial checkData method so I couldn’t easily see what it was doing or what to modify.
Since the decompilation failed I had to analyze the Smali code for checkData instead. Searching for 431337133713373 in the code reveals the IMSI comparison part of the code.
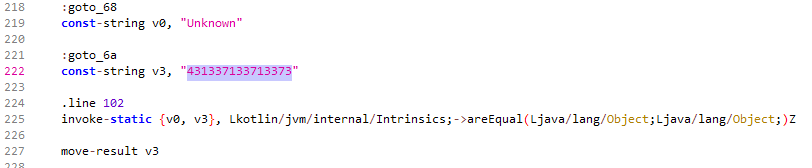
Here we can see that the comparison is done using the version of kotlin.jvm.internal.Intrinsics that takes two objects as arguments. By hooking this particular method we can make sure that it always returns true when the second argument is “431337133713373”.
Java.perform(function(){
  var intrinsics = Java.use('kotlin.jvm.internal.Intrinsics');
  intrinsics.areEqual.overload('java.lang.Object', 'java.lang.Object').implementation = function(a, b){
    if (b.toString() == "431337133713373") {
      return true;
    }
    return this.areEqual(a, b);
  }
});
So rather than modify what value the app gets from the system we modify the comparison method so that everything is equal to 431337133713373 and the flag is ours.
Authentication: 2FA - Response Manipulation
Now for some change, let’s tackle the 2FA - Response Manipulation challenge. In this challenge you receive a hashed OTP code from the server which is compared to the hashed version of the OTP code you provide.

Since the data we got from the server is hashed we can’t see what the correct OTP code is, but that isn’t actually needed. The OTP verification happens on the client side, so if we manipulate the response from the server (using for example Burp) to provide the hash of whatever OTP we provide the verification will succeed.
We can create a small Frida script to see what the calculated hash of our input is and then just modify the response from the server to match this hash.
Java.perform(function(){
  var otp = Java.use('com.hpandro.androidsecurity.ui.activity.task.authentication.responseMani.ResponseManipOTPActivity');
  otp.otpToSHA1.implementation = function(a) {
    var ret = this.otpToSHA1(a);
    console.log("input: " + a + " return: " + ret);
    return ret;
  }
});
With this in place all that’s left is a little bit of Burp magic to manipulate the response, but since this is a blog about Frida and not Burp I won’t go into details on how to do that.
With another flag claimed with the help of Frida it’s time to wrap up for this time. When you’re ready, continue to part 2 where we’ll take on a couple of more challenges from the hpAndro vulnerable application.
All the Frida scripts written for these challenges are available on GitHub